How to Add Stripe One-Time Payment Form to Laravel Project
 Povilas Korop
Founder of QuickAdminPanel
Payments are one of the most typical elements of any web-project, and Stripe is a payment provider that is really easy to install in Laravel projects. In this article, we will add a payment form to the page.
As an example, we will take a Product Show page from our QuickAdminPanel Product Management module, but you can follow the same instructions and add Stripe form to ANY Laravel project page.
The plan will consist of 8 steps:
- Install Laravel Cashier
- Run Cashier migrations
- Stripe Credentials in .env
- User Model should be Billable
- Controller: Form Payment Intent
- Blade Page: Form, Styles, and Scripts
- Controller: Post Payment Processing
- After Successful Purchase: Send Product
Let’s begin!
1. Install Laravel Cashier
Run this command:
composer require laravel/cashier
Notice: Currently, the latest version of Cashier is v12. If you’re reading this article when the newer version has arrived, please read its upgrade guide. But personally, I doubt that any fundamentals will change.
2. Run Cashier migrations
Cashier package registers its own database migration directory, so remember to migrate your database after installing the package:
php artisan migrate
Those migrations are not in database/migrations folder, they are inside /vendor. Here are the contents.
1. Four new columns to users table:
Schema::table('users', function (Blueprint $table) {
    $table->string('stripe_id')->nullable()->index();
    $table->string('card_brand')->nullable();
    $table->string('card_last_four', 4)->nullable();
    $table->timestamp('trial_ends_at')->nullable();
});
2. New table subscriptions:
Schema::create('subscriptions', function (Blueprint $table) {
    $table->bigIncrements('id');
    $table->unsignedBigInteger('user_id');
    $table->string('name');
    $table->string('stripe_id');
    $table->string('stripe_status');
    $table->string('stripe_plan')->nullable();
    $table->integer('quantity')->nullable();
    $table->timestamp('trial_ends_at')->nullable();
    $table->timestamp('ends_at')->nullable();
    $table->timestamps();

    $table->index(['user_id', 'stripe_status']);
});
3. New table subscription_items:
Schema::create('subscription_items', function (Blueprint $table) {
    $table->bigIncrements('id');
    $table->unsignedBigInteger('subscription_id');
    $table->string('stripe_id')->index();
    $table->string('stripe_plan');
    $table->integer('quantity');
    $table->timestamps();

    $table->unique(['subscription_id', 'stripe_plan']);
});
3. Stripe Credentials in .env
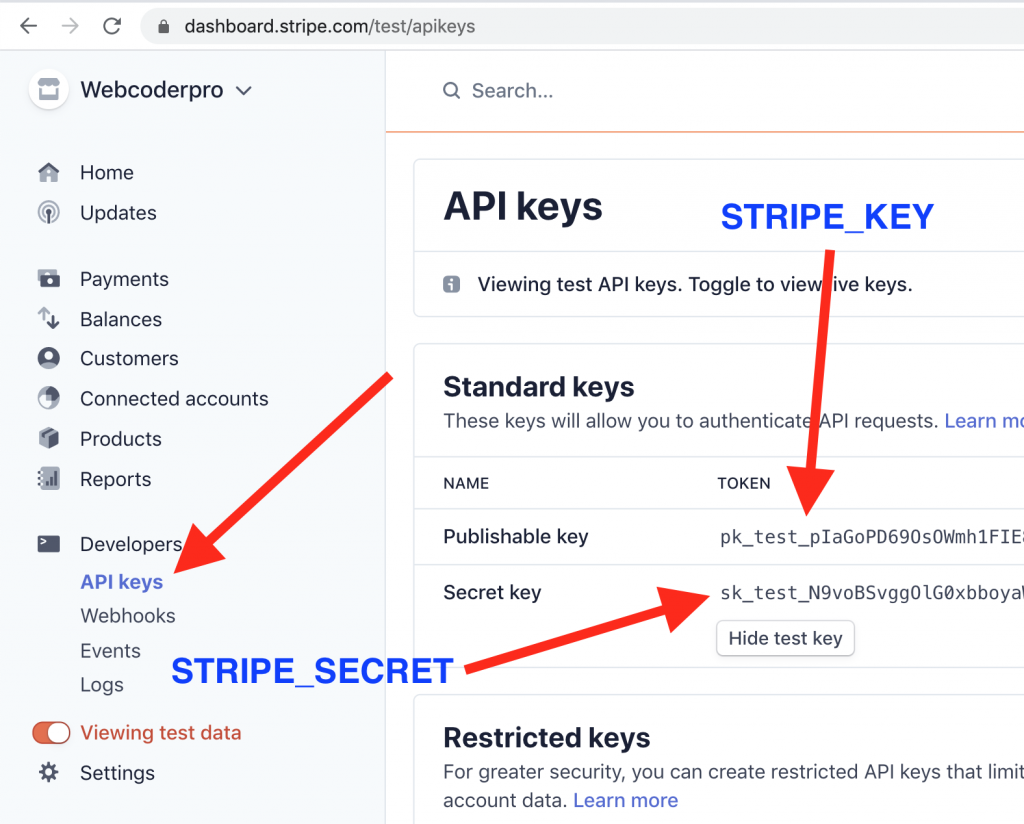
There are two Stripe credentials that you need to add in your .env file:
STRIPE_KEY=pk_test_xxxxxxxxx
STRIPE_SECRET=sk_test_xxxxxxxxx
Where to get those “key” and “secret”? In your Stripe Dashboard:
Keep in mind, there are two “modes” of Stripe keys: testing and live keys. While on your local or testing servers, please remember to use TESTING keys, you can view them by toggling “View Testing Data” on the left menu:
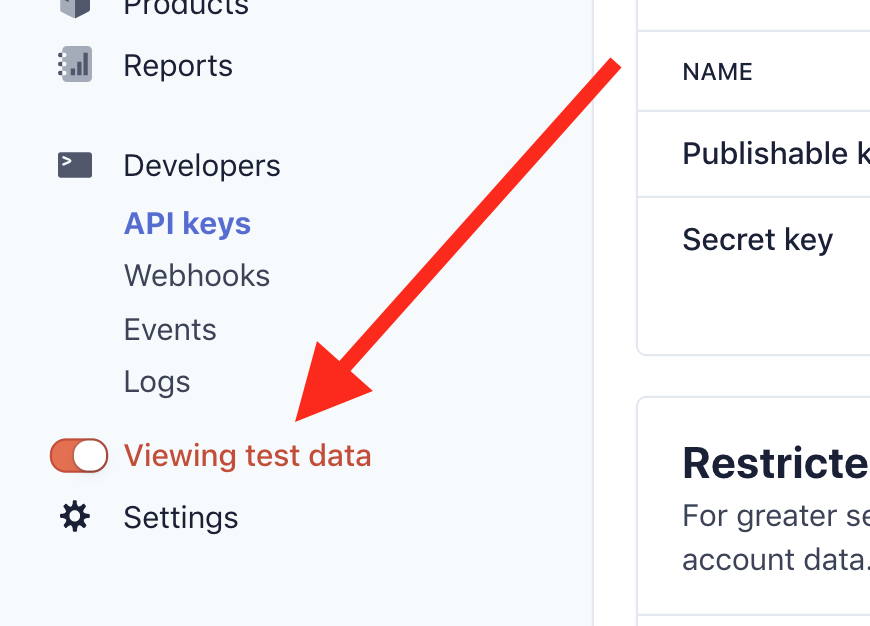
Another way to know if you’re using testing/live keys: the testing keys start with sk_test_ and pk_test_, and live keys start with sk_live_ and pk_live_. Also, live keys won’t work without SSL certificate enabled.
Notice: if you work in a team, when you add new variables, it’s a very good practice to also add them with empty values in .env.example. Then your teammates will know what variables are needed on their server. Read more here.
4. User Model should be Billable
Simple step: in your User model, add Billable trait from Cashier:
app/Models/User.php:
// ...
use Laravel\Cashier\Billable;

class User extends Authenticatable
{
    use HasFactory, Billable;
5. Controller: Form Payment Intent
To enable the Stripe payment form, we need to create a thing called “payment intent” and pass it to the Blade.
In this case, we will add it to ProductController method show():
class ProductController extends Controller
{
    // ...

    public function show(Product $product)
    {
        $intent = auth()->user()->createSetupIntent();

        return view('frontend.coupons.show', compact('product', 'intent'));
    }
Method createSetupIntent() comes from the Billable trait that we added just above in User model.
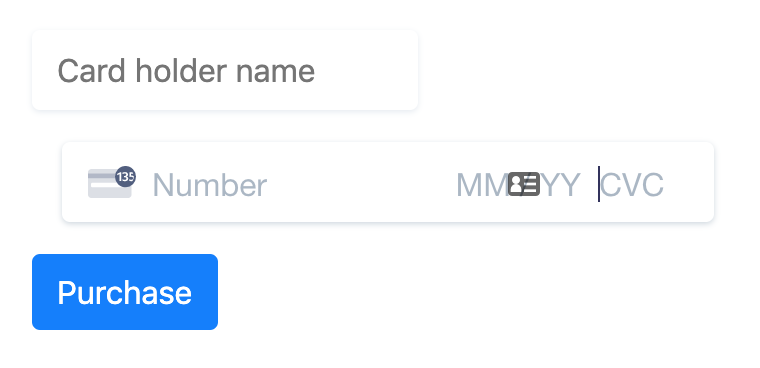
6. Blade Page: Form, Styles, and Scripts
This is the form that we will add from Stripe, with cardholder name, card number, expiry month/year, CVV code, and ZIP code.
Luckily, Stripe documentation tells us exactly what HTML/JavaScript/CSS code should be added.
So, in our show.blade.php, we add this:
<form method="POST" action="{{ route('products.purchase', $product->id) }}" class="card-form mt-3 mb-3">
    @csrf
    <input type="hidden" name="payment_method" class="payment-method">
    <input class="StripeElement mb-3" name="card_holder_name" placeholder="Card holder name" required>
    <div class="col-lg-4 col-md-6">
        <div id="card-element"></div>
    </div>
    <div id="card-errors" role="alert"></div>
    <div class="form-group mt-3">
        <button type="submit" class="btn btn-primary pay">
            Purchase
        </button>
    </div>
</form>
All the input variables are exactly as Stripe suggests it, the only element that you would need to change is the route, where the form would be posted, so this:
route('products.purchase', $product->id)
We will create that route and Controller method in the next step.
Meanwhile, we also need to include Stripe’s Styles and JavaScript.
Let’s imagine that in your main Blade file, you have @yield sections for styles and scripts, like this:
<!DOCTYPE html>
<html>

<head>
    ...

    @yield('styles')
</head>

<body>
    ...


    @yield('scripts')
</body>
</html>
Then, in our show.blade.php, we may fill in those sections, with code from Stripe:
@section('styles')
<style>
    .StripeElement {
        box-sizing: border-box;
        height: 40px;
        padding: 10px 12px;
        border: 1px solid transparent;
        border-radius: 4px;
        background-color: white;
        box-shadow: 0 1px 3px 0 #e6ebf1;
        -webkit-transition: box-shadow 150ms ease;
        transition: box-shadow 150ms ease;
    }
    .StripeElement--focus {
        box-shadow: 0 1px 3px 0 #cfd7df;
    }
    .StripeElement--invalid {
        border-color: #fa755a;
    }
    .StripeElement--webkit-autofill {
        background-color: #fefde5 !important;
    }
</style>
@endsection

@section('scripts')
<script src="https://js.stripe.com/v3/"></script>
<script>
    let stripe = Stripe("{{ env('STRIPE_KEY') }}")
    let elements = stripe.elements()
    let style = {
        base: {
            color: '#32325d',
            fontFamily: '"Helvetica Neue", Helvetica, sans-serif',
            fontSmoothing: 'antialiased',
            fontSize: '16px',
            '::placeholder': {
                color: '#aab7c4'
            }
        },
        invalid: {
            color: '#fa755a',
            iconColor: '#fa755a'
        }
    }
    let card = elements.create('card', {style: style})
    card.mount('#card-element')
    let paymentMethod = null
    $('.card-form').on('submit', function (e) {
        $('button.pay').attr('disabled', true)
        if (paymentMethod) {
            return true
        }
        stripe.confirmCardSetup(
            "{{ $intent->client_secret }}",
            {
                payment_method: {
                    card: card,
                    billing_details: {name: $('.card_holder_name').val()}
                }
            }
        ).then(function (result) {
            if (result.error) {
                $('#card-errors').text(result.error.message)
                $('button.pay').removeAttr('disabled')
            } else {
                paymentMethod = result.setupIntent.payment_method
                $('.payment-method').val(paymentMethod)
                $('.card-form').submit()
            }
        })
        return false
    })
</script>
Inside of those sections, we’re adding two variables from the back-end:
env('STRIPE_KEY')
and
$intent->client_secret
So make sure you added them in the previous steps.
7. Controller: Post Payment Processing
Remember the route that we called in the previous step? Time to create it.
In routes/web.php, add this:
Route::post('products/{id}/purchase', 'ProductController@purchase')->name('products.purchase');
And then, let’s create a method in ProductController:
public function purchase(Request $request, Product $product)
{
    $user          = $request->user();
    $paymentMethod = $request->input('payment_method');

    try {
        $user->createOrGetStripeCustomer();
        $user->updateDefaultPaymentMethod($paymentMethod);
        $user->charge($product->price * 100, $paymentMethod);
    } catch (\Exception $exception) {
        return back()->with('error', $exception->getMessage());
    }

    return back()->with('message', 'Product purchased successfully!');
}
So what is happening here?
1. We’re getting payment_method from the form (Stripe handles it in the background for us)
2. Then we call the Cashier methods to get/create the customer, set their payment method, and charge them.
3. Finally, we redirect back with success result
3b. If something goes wrong, try/catch block handles it and redirects back with an error.
Notice: variable $product->price is the price for your product, and we need to multiply it by 100 because Stripe charge is happening in cents.
To show the success message or errors, in your Blade file, you need to add something like this:
@if(session('message'))
    <div class="alert alert-success" role="alert">{{ session('message') }}</div>
@endif
@if(session('error'))
    <div class="alert alert-danger" role="alert">{{ session('error') }}</div>
@endif
8. After Successful Purchase: Send Product
After the customer paid for the product, you need to deliver the order. Of course, it depends on what they purchased and that code is very individual, but I will show you where to put it.
In fact, there are two ways. Easier but less secure, or harder and more secure.
Option 1. Fulfill Order in ProductController
You can do that directly in the same method:
public function purchase(Request $request, Product $product)
{
    $user          = $request->user();
    $paymentMethod = $request->input('payment_method');

    try {
        $user->createOrGetStripeCustomer();
        $user->updateDefaultPaymentMethod($paymentMethod);
        $user->charge($product->price * 100, $paymentMethod);
    } catch (\Exception $exception) {
        return back()->with('error', $exception->getMessage());
    }

    // Here, complete the order, like, send a notification email
    $user->notify(new OrderProcessed($product));

    return back()->with('message', 'Product purchased successfully!');
}
Easy, right? The problem with that method is that it’s happening in sync, which means that $user->charge() may not be actually successfully finished, by the time you fulfill the order. In theory, it may cause false order deliveries with unsuccessful charges.
Option 2. Stripe Webhooks
Or, a more reliable method, is to catch so-called Stripe Webhooks. They ensure that the charge happened successfully, in the correct way. Whenever something happens in Stripe, they send a POST request to your server’s URL that you provide in the Stripe dashboard.
You can catch a lot of events from Stripe, and one of those events is charge.succeeded.
For that, I would recommend using a package called Laravel Stripe Webhooks, I’ve shot a separate video about it:
So if you want to catch more events, and not only charge success, I advise you to use Stripe Webhooks. Keep in mind they won’t (easily) work on your local computer, you need to set up a real domain that Stripe would call.
That’s it! Wish you to receive a lot of successful payments in your projects.