QuickAdminPanel API Generator with Laravel Passport
 Povilas Korop
Founder of QuickAdminPanel
Important update: in late 2020, we switched API Auth mechanism from Laravel Passport to Laravel Sanctum. So this article is outdated, please read the new instructions: QuickAdminPanel API Generator with Laravel Sanctum
* * * * * * * * * *
In our QuickAdminPanel, we had simple API generator for quite a while, we’ve even released its open-source version as a package. But the most often question from our customers was “how to handle authorization in that API?”. Today, we finally have an answer for that, with a new version release.
We thought we should use another Laravel standard for authentication, which is Laravel Passport. So, here’s how new version of API generator works.
In case you prefer video explanations, here’s a video version of this article:
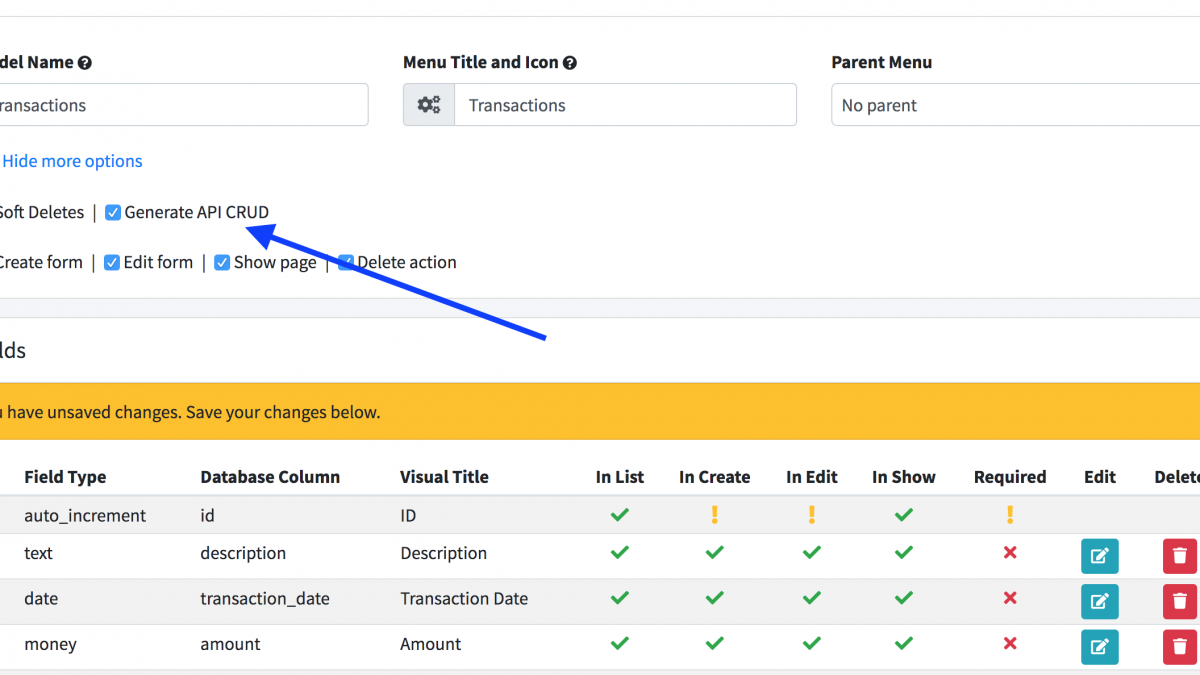
First, all you need to do, to enable API for a particular CRUD, is to tick that Generate API CRUD checkbox in options. In fact, it’s checked for you by default.

Then, you get all API-related files generated:
- routes/api.php – separate line for that CRUD
- app/Http/Controllers/Api/V1/TransactionsApiController.php
- app/Http/Resources/Admin/TransactionResource.php
- app/Providers/RouteServiceProvider.php special method mapApiRoutes();
Simple, huh? But if you try to reach the endpoint api/v1/[your_crud_name] without any token, you get 500 error:
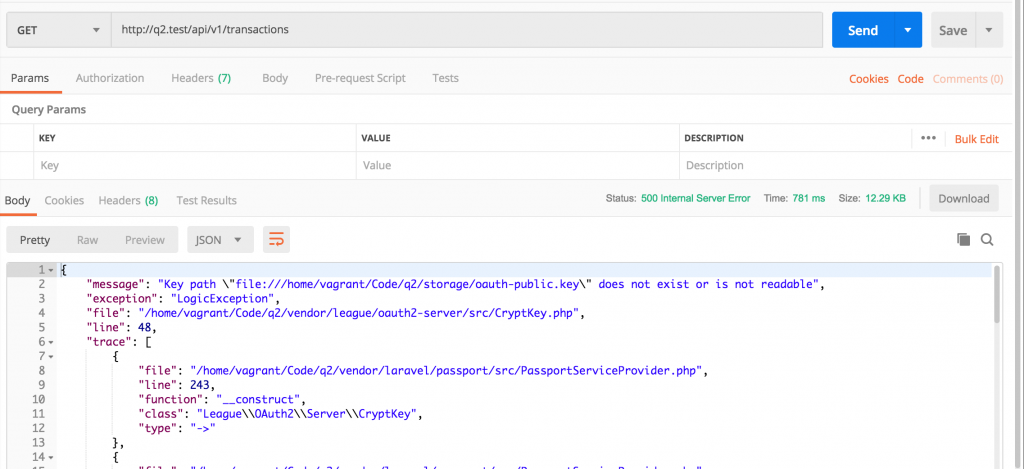
This error means that Laravel Passport is not installed.
Installing and Configure Laravel Passport
By default, in config/auth.php we generate API Driver as ‘passport’:
'guards' => [
    'web' => [
        'driver'   => 'session',
        'provider' => 'users',
    ],

    'api' => [
        'driver'   => 'passport',
        'provider' => 'users',
        'hash'     => false,
    ],
],
Also, we have Passport generated in our composer.json file:
{
    "name": "laravel/laravel",
    // ...
    "require": {
        "php": "^7.1.3",
        // ...
        "laravel/passport": "^7.3"
    },
Now, we need to run this command to generate Passport-related DB tables and entries:
php artisan passport:install
Result is this:
Encryption keys generated successfully.
Personal access client created successfully.
Client ID: 1
Client secret: KAY4k312yebafievTzWNQWuY4nUEDfvAqFRSQo0b
Password grant client created successfully.
Client ID: 2
Client secret: 1OSbOGyJsXgA1QlbCzL3cPv7LhJAUZuTcIRSbKmm
What does it actually mean? This, in the database:
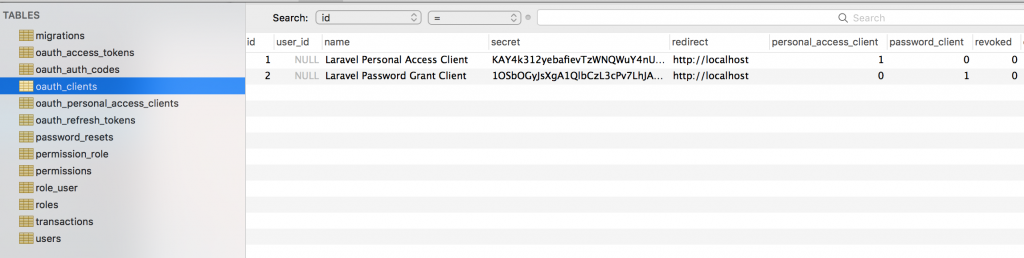
Copy the Client ID and Client secret to somewhere for Password grant client. You will need that to retrieve access token for your user to access an API (more on that later).
Now, Passport is installed, and if we launch our API endpoint call, we should get another error – 401 Unauthenticated.
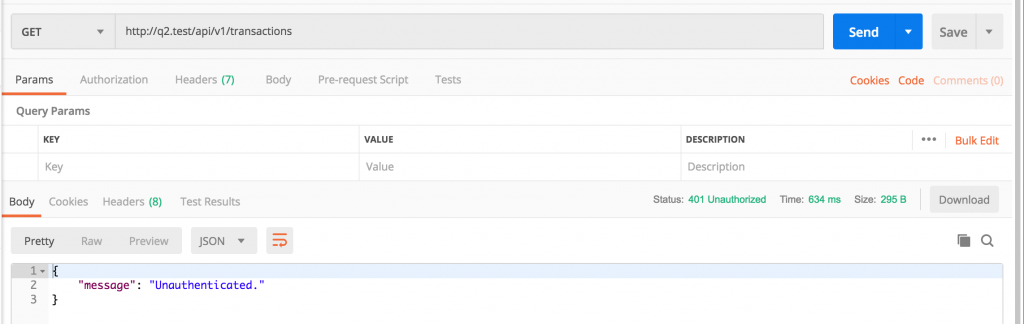
Next step – to authenticate certain user with Laravel Passport.
Authenticating a User with Laravel Passport
Laravel Passport uses OAuth2 concept, which may seem complicated, but in our version it’s actually pretty simple – we will use so-called Password Grant Tokens.
We need to make API request in two steps:
- Step 1: API Request to authenticate user and get access token with Passport credentials;
- Step 2: Actual API Request for Data, passing that token from Step 1.
To retrieve your access token you need to make POST request to /oauth/token URL, with these body parameters:
'grant_type' => 'password',
'client_id' => 'client-id', // Client ID from passport:install above
'client_secret' => 'client-secret', // Client Secret from passport:install above
'username' => 'admin@admin.com', // username and password are email and password of actual DB user
'password' => 'somepassword',
'scope' => '', // empty in our case
Example from the official documentation, with Guzzle client:
$http = new GuzzleHttp\Client;

$response = $http->post('http://your-app.com/oauth/token', [
    'form_params' => [
        'grant_type' => 'password',
        'client_id' => 'client-id',
        'client_secret' => 'client-secret',
        'username' => 'taylor@laravel.com',
        'password' => 'my-password',
        'scope' => '',
    ],
]);

return json_decode((string) $response->getBody(), true);
Example with Postman, with exactly the credentials from above, and we’re trying to authenticate as our default admin@admin.com user:
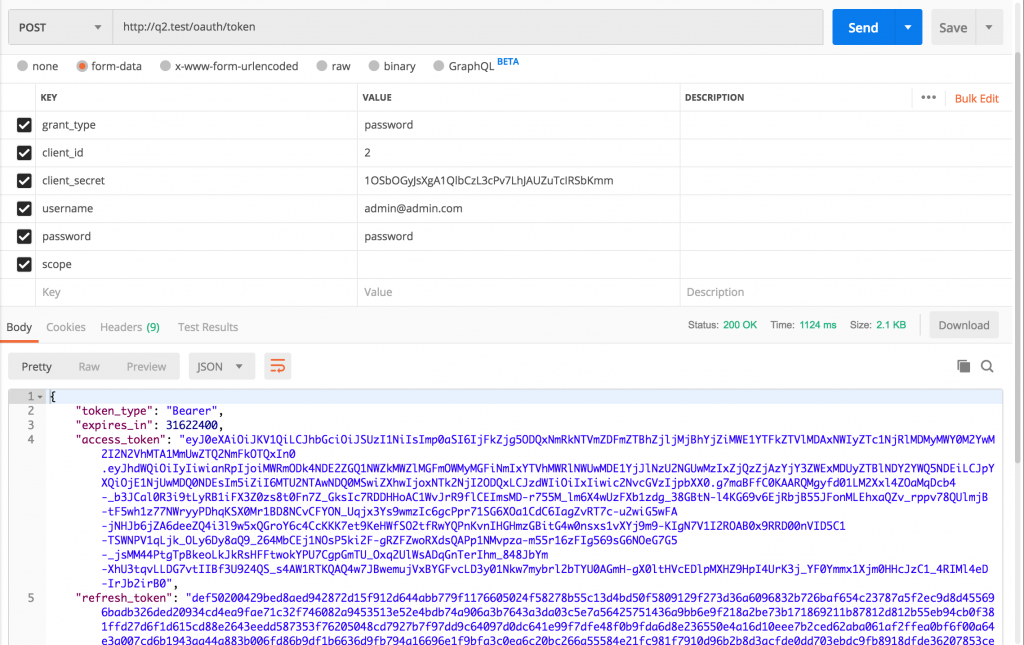
You can see a successful response here, and the most useful part for us is access_token value returned. We need to copy-paste it to make the actual request for API endpoint. Like this:
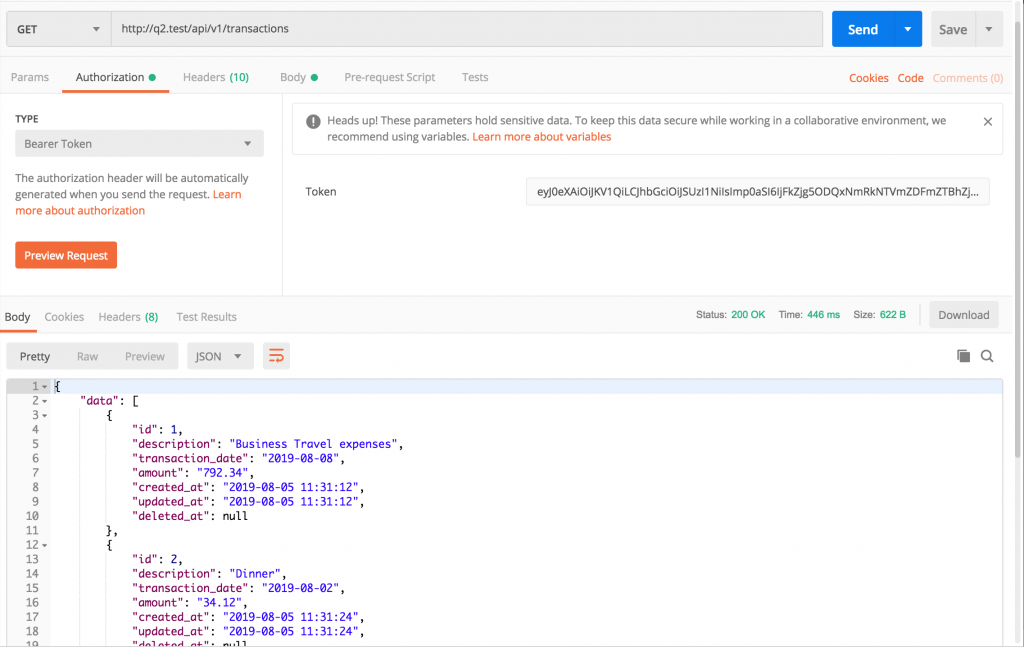
Of course, Postman makes it easy to just paste the token in one of the Authentication sections. But if you’re doing request without Postman, it’s just a Bearer token, see CURL example:
curl -H 'Accept: application/json' \
    -H 'Authorization: Bearer eyJ0eXAiOiJKV1QiLCJhbGciOiJSUzI1NiIsImp0aSI6ImY3MDQxZjQ1OWQ4NGY3OTBjZGU1MzhlM2RkNDIyY2YxOGFmMDY3NGM0YTA0ZGNiNjI2ZTgxZGEzNTM0YTk4M2VkYjdhZGExOTliY2RmNzkwIn0.eyJhdWQiOiIyIiwianRpIjoiZjcwNDFmNDU5ZDg0Zjc5MGNkZTUzOGUzZGQ0MjJjZjE4YWYwNjc0YzRhMDRkY2I2MjZlODFkYTM1MzRhOTgzZWRiN2FkYTE5OWJjZGY3OTAiLCJpYXQiOjE1NjQ3NDI1OTgsIm5iZiI6MTU2NDc0MjU5OCwiZXhwIjoxNTk2MzY0OTk4LCJzdWIiOiIxIiwic2NvcGVzIjpbIioiXX0.vhjCK7dcRExXuawQnxd7mw3Cf6dD0qY6s61u86OwAuLd86UAmDgFWlj-PehfE5F6wcScKov-oDCOXL3jYba-gvTIMRSuDRkGmpNYTDZCzf72a595RJ7VLibCVfyxrN_kW9_nZBmHHX_DDgYX5wtu9QCAtD_bQS61RAC0h5tw-WkHv2A1XTxFqEefTQkkD1JsQjo2v1iL11O4Uj6zHsZ_SnTLtLWGVvhhenYFq4iElFnD7xevzlxdomFG6AEkXkV6wjM2JUyYYdpSB7gYD5xso4Kvzk3Sa0U1n3GZ-hGCLaJnMwBvaBY3nfFTB7_ppMHgG81eNVCX00jjmnEKRM-V6ZUKAVCcoUXnnAHm4CYz2bHhxxzYpkMc8SybS2Z1jP2OODxFIWqZkEQHX92auUUIq6EMuKTgKCJ6WBWdhBs5RA5rFkGitoy_RrRQjJNcgEQLauIqKzKHIPtx-AsIc5tPK-JmoEuMAoAp8Bt2jtXbe6Lq8IJULt0rS_isqzF_1cG8AQCpvAxkmF-PmTeX8FkQ5P1f7XHu3OM0Sn-8EODxilxB3hvEB3JXAX6UfLyG9tcVUnij34MvkfRmJ9YLmSB-tYlb5nMg56_eY9AnBs8EniblK029TZVzkkqKCA5hIYEmdFzyl137MJeJmDFYjmntALzhbQYoouTcKrhGXqBjo4I' \
    http://q2.test/api/v1/transactions
So, that’s it – we’ve authenticated our administrator in one request, and then made a specific data request with that token.
But wait, there’s more – you can use our Gate system to have specific permissions per user.
Protecting Endpoints with Auth Middleware
There are actually two levels of authorization for every API request:
- Authentication with user/password – in case of failure, you get 401 Unauthenticated;
- After that, authorization for specific feature – in case of failure, you get 403 Unauthorized.
So far we’ve covered the first part – authentication of our user. But in our QuickAdminPanel, we have quite powerful roles/permissions system, and it is re-used for both web and API auth.
Here’s how TransactionsApiController.php looks like:
class TransactionsApiController extends Controller
{
    public function index()
    {
        abort_if(Gate::denies('transaction_access'),
            Response::HTTP_FORBIDDEN,
            '403 Forbidden');

        return new TransactionResource(Transaction::all());
    }

    // ...
See that abort_if(), and checking of the gate by transaction_access name? It comes from the database:
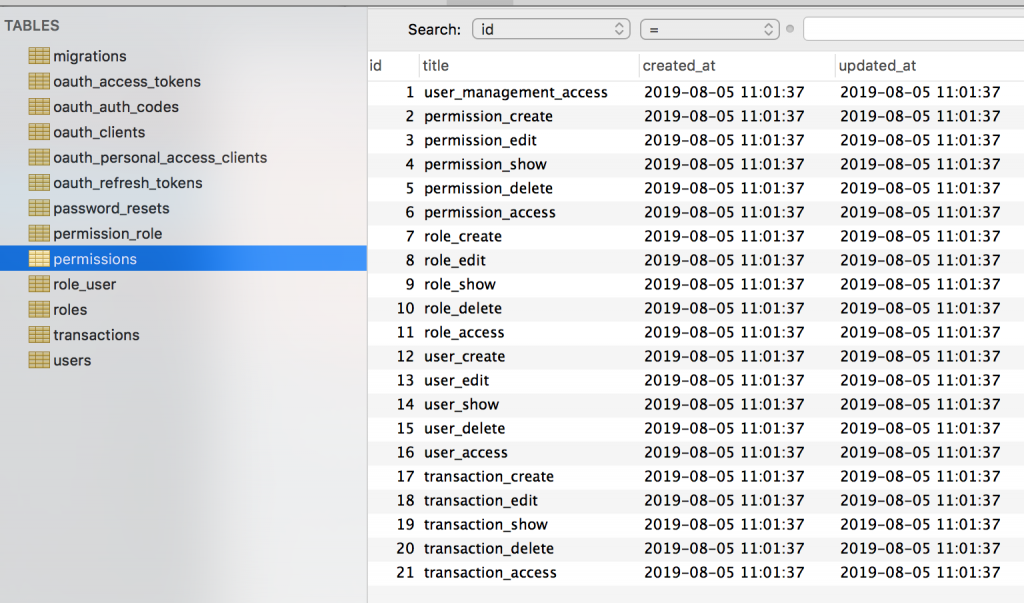
So, if you authenticate with non-admin user that doesn’t have that transaction_access permission, you will get 403 Unauthorized error.
How does it all work under the hood?
First, here’s how routes/api.php looks:
Route::group([
    'prefix' => 'v1',
    'as' => 'api.',
    'namespace' => 'Api\V1\Admin',
    'middleware' => ['auth:api']
], function () {
    Route::apiResource('transactions', 'TransactionsApiController');
});
Next, we have a Middleware called AuthGates, to generate all the Gates for a particular request:
class AuthGates
{
    public function handle($request, Closure $next)
    {
        $user = \Auth::user();

        if (!app()->runningInConsole() && $user) {
            $roles            = Role::with('permissions')->get();
            $permissionsArray = [];

            foreach ($roles as $role) {
                foreach ($role->permissions as $permissions) {
                    $permissionsArray[$permissions->title][] = $role->id;
                }
            }

            foreach ($permissionsArray as $title => $roles) {
                Gate::define($title, function (\App\User $user) use ($roles) {
                    return count(array_intersect($user->roles->pluck('id')->toArray(), $roles)) > 0;
                });
            }
        }

        return $next($request);
    }
}
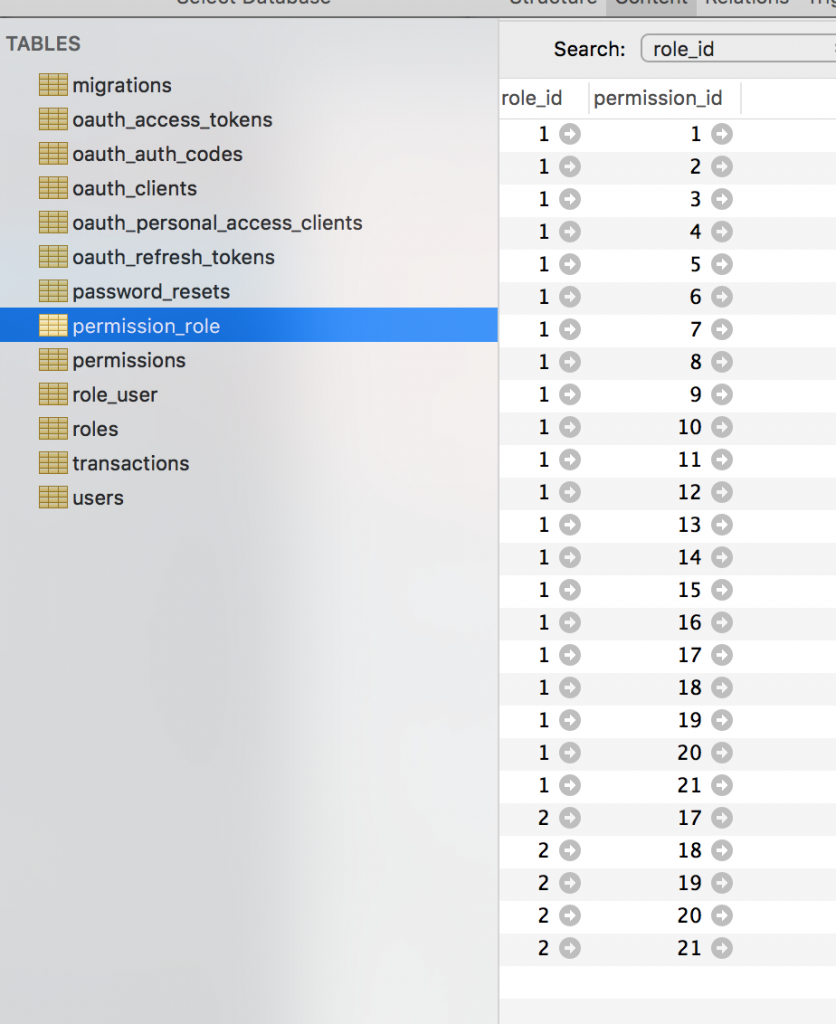
It takes all the permissions from the database permission_role DB table, and defines them as Gates.
That middleware class is added for all requests, both ‘api’ and ‘web’, in app/Http/Kernel.php:
protected $middlewareGroups = [
    'api' => [
        'throttle:60,1',
        'bindings',
        \App\Http\Middleware\AuthGates::class,
    ],
    'web' => [
        \App\Http\Middleware\EncryptCookies::class,
        // ...
        \App\Http\Middleware\AuthGates::class,
    ],
];
And, that’s it. I know it may sound complicated, but that’s probably the most standard and secure way these days to authenticate API requests.
Final thing: if you want to remove this Laravel Passport functionality, we have a separate article: How to Remove Laravel Passport and Make API Public