
Stripe Payments in Laravel: The Ultimate Guide
 Povilas Korop
Founder of QuickAdminPanel
Notice: this article was written in 2017, so Stripe API has likely changed since then, so use with caution and check latest versions of Stripe documentation.
Stripe is one of the most popular payment merchants for web, but information about Laravel integration is pretty fragmented, so I decided to write a really long tutorial about this topic.
We will cover:
- General logic how Stripe works
- Simple one-time payment integration
- Testing and production environment setup
- Saving transaction data for future reference
- Recurring payments with Laravel Cashier
- Getting invoices data and PDF download
What is Stripe and how it works
Stripe is a system to accept payments via credit cards. Instead of you handling all the security compliance and banking transactions, Stripe does it for you, while taking a small percentage for that.
Note that Stripe is available only in some countries, at the time of writing it’s 25 of them:

The most basic implementation is called Stripe Checkout.
Technically, it works like this (we will cover each step in more details later):
Step 1. JavaScript
You add Stripe Javascript code on your page.
Step 2. Pay Button: Enter Credit Card
User enters Credit Card details on your page via modal.
Step 3. Check Credit Card
AJAX call is made to Stripe server for checking the credit card. If the card is accepted, Stripe returns a unique token which represents that card for all future reference from your application, so you don’t actually ever store card details in your database (which is really important from legal perspective).
Step 4. Charging the Card
Then you can call Stripe servers again to actually charge the card, referencing with the token from Step 3 – one time or for recurrent payments.
There are more events, like processing errors, storing customer details in Stripe database, processing refunds and more, but these are the basics you need to know for now.
Now, let’s cover those steps in more details, with a sample application.
Laravel Stripe Checkout Demo
Step 1. Stripe Button “Pay with Card”
Ok, let’s start with a sample Laravel application:
composer create-project laravel/laravel --prefer-dist .
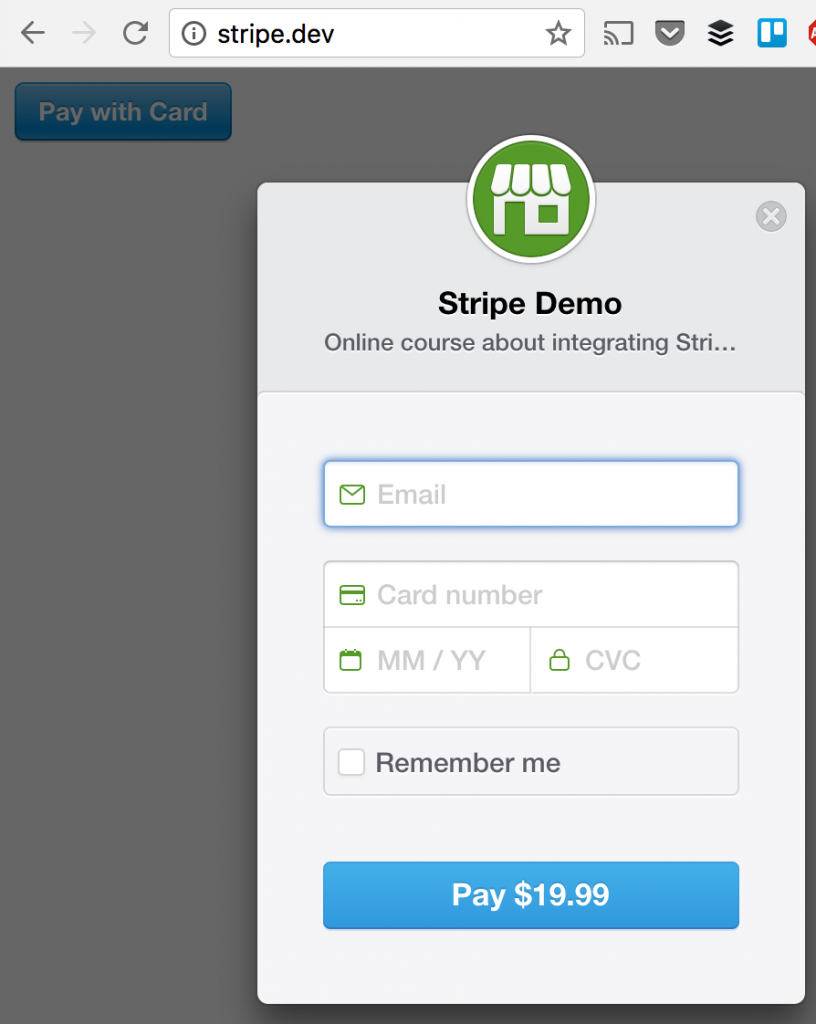
After all the installation and domain configuration (I’ve configured stripe.dev via Homestead), we should see a homepage like this:

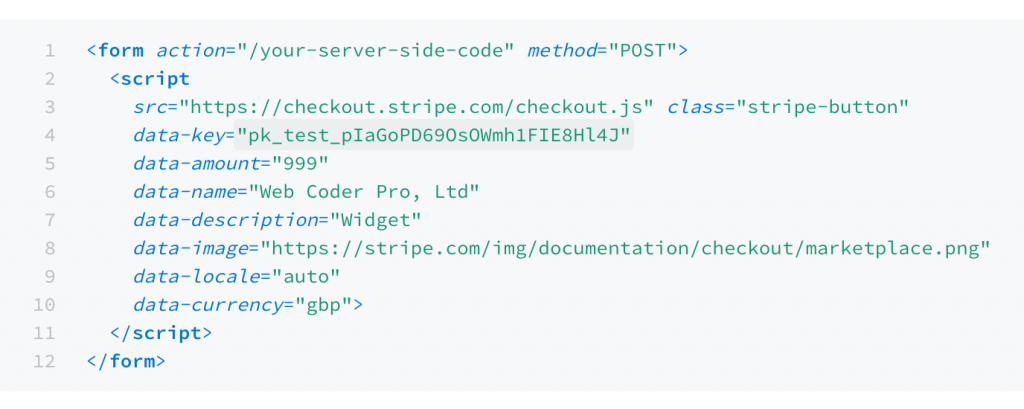
Next step – we replace our homepage, which is located in resources/views/welcome.blade.php, with Stripe code from their official documentation.
Here’s our new welcome.blade.php:
<!doctype html>
<html lang="{{ app()->getLocale() }}">
    <head>
        <meta charset="utf-8">
        <meta http-equiv="X-UA-Compatible" content="IE=edge">
        <meta name="viewport" content="width=device-width, initial-scale=1">

        <title>Laravel</title>
    </head>
    <body>
        <form action="/your-server-side-code" method="POST">
            <script
                    src="https://checkout.stripe.com/checkout.js" class="stripe-button"
                    data-key="pk_test_pIaGoPD69OsOWmh1FIE8Hl4J"
                    data-amount="1999"
                    data-name="Stripe Demo"
                    data-description="Online course about integrating Stripe"
                    data-image="https://stripe.com/img/documentation/checkout/marketplace.png"
                    data-locale="auto"
                    data-currency="usd">
            </script>
        </form>
    </body>
</html>
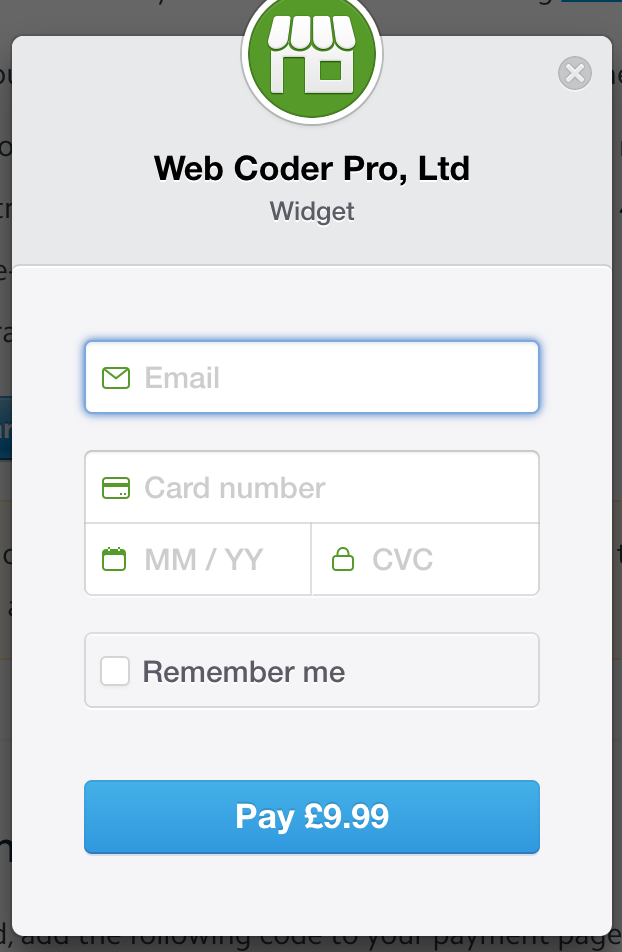
And then we have this button, with modal appearing after the click:
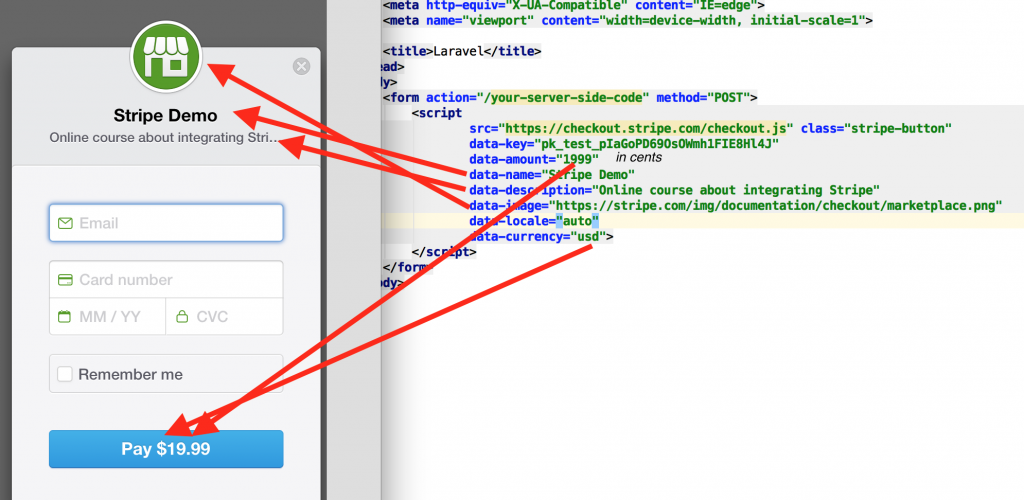
As you may have noticed, I’ve changed a few variables – so here’s a schema with dependencies between Stripe variables and modal window:
Step 2. Environment variables
There is one important field we need to discuss separately – called data-key. Which means – how do we identify that this is our Stripe account and not someone else’s.
<script
        src="https://checkout.stripe.com/checkout.js" class="stripe-button"
        data-key="pk_test_xxxxxxxxxxxxxxxxxx"
        data-amount="1999"
...
To authenticate, Stripe gives you two pairs of credentials, so-called Publishable and Secret key – both for testing version (starting with xx_test_xxxxx) and for live version (starting with xx_live_xxxxx).
You can find them under API section in your dashboard, see below.
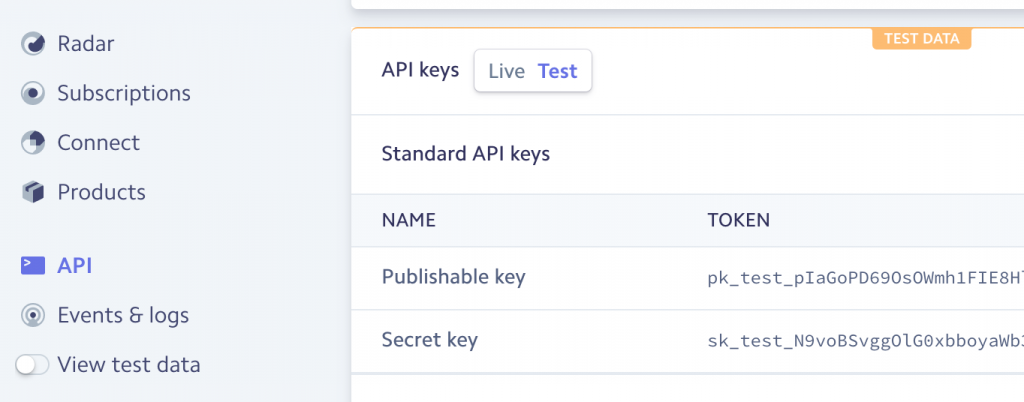
So we need to put one pair into our code, depending on whether you’re testing the payment, or want to accept real money from real credit cards on live environment.
In Stripe default example, you see that the Publishable key is listed as JavaScript variable, but I would still prefer to hide it from the public and put it into .env file of Laravel project.
Another benefit of this is that we could use one .env file for our local/staging environment, for testing, and separate .env on production server with live credentials.
So let’s add both variables inside our .env, like this:
STRIPE_PUB_KEY=pk_test_pIaGoPD69OsOWmh1xxxxxxxx
STRIPE_SECRET_KEY=sk_test_N9voBSvggOlG0xbboxxxxxxxx
Notice: I’ve hidden some characters under xxxxxxx, your credentials should be different.
And then we change our welcome.blade.php code to this:
<script
        src="https://checkout.stripe.com/checkout.js" class="stripe-button"
        data-key="{{ env('STRIPE_PUB_KEY') }}"
        data-amount="1999"
        data-name="Stripe Demo"
In a few minutes, I will explain where the Secret key is actually used, stick with me.
Step 3. Stripe Token and Check Card
Ok, now we have the form showing up, but what happens if we actually fill in credit card details and click Pay?
Two things happen, actually:
- Stripe JavaScript calls Stripe API with credit card details and gets a card token, or an error otherwise
- If the token is received successfully, then our form gets submitted, and then our Laravel logic takes care of actually charging (we will show it in the next step)
For example, if we enter any dummy data, we get error from modal window and bordered the fields which are incorrect:
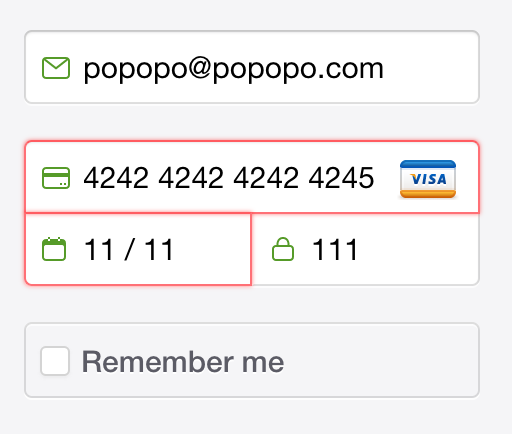
The best thing here is that we don’t need to take care of every possible error with the card – Stripe shows the actual error text immediately within that modal window.
Moreover, for testing they provide the list of credit cards with various errors caused:
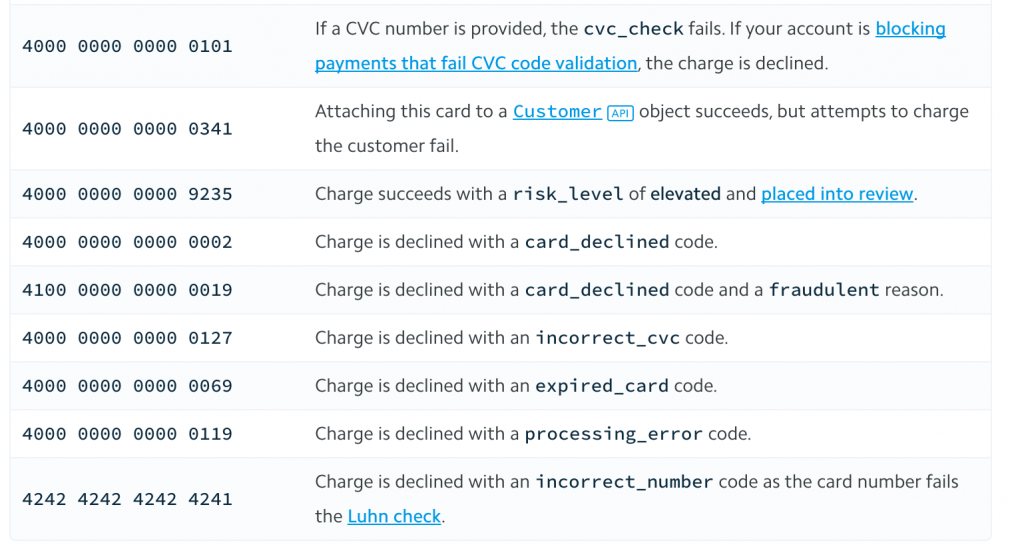
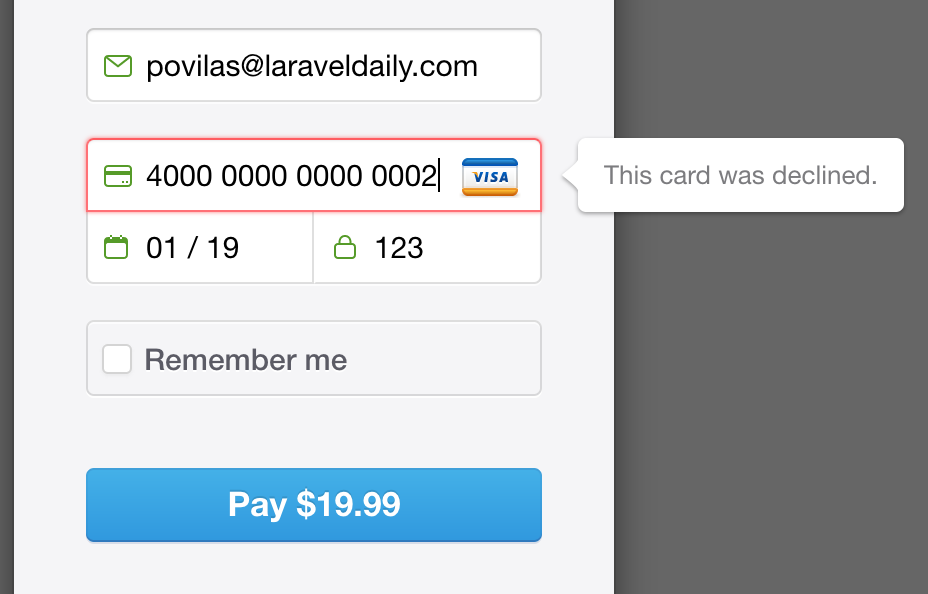
For example, if we enter 4000 0000 0000 0002, then we see this:
Now, enough about errors: how do we know what “correct” details to enter for testing, how do we “fake” credit card?
Stripe gives us the list of credit card numbers for testing, the most popular is 4242 4242 4242 4242 and then you enter any future date, and any CVC code – and then you should get a success sign:
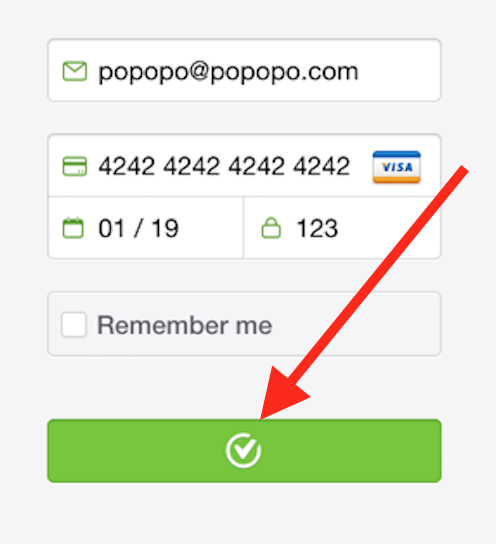
Then Stripe automatically submits the form around the JavaScript code:
<form action="/your-server-side-code" method="POST">
    <script
            src="https://checkout.stripe.com/checkout.js" class="stripe-button"
    ...
    </script>
</form>
And this is where we have a problem – our /your-server-side-code does not exist yet!
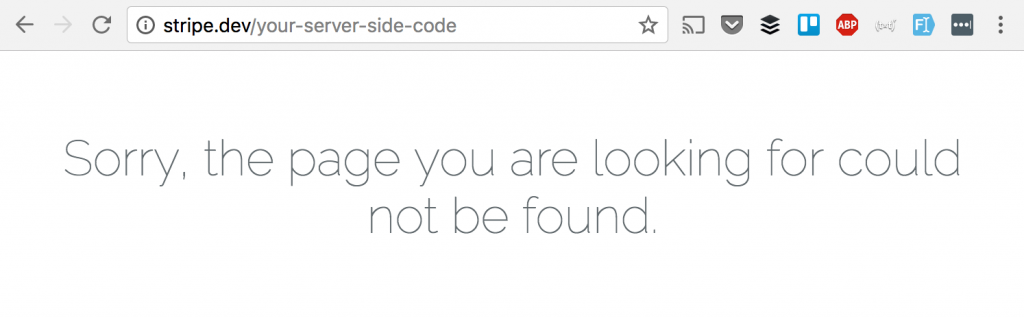
Let’s create a route and controller for the actual checkout.
routes/web.php:
Route::post('/charge', 'CheckoutController@charge');
Then we change the form POST route and add Laravel token:
<form action="/charge" method="POST">
    {{ csrf_field() }}
Then we run:
php artisan make:controller CheckoutController
And fill in the code, for now – let’s see what Stripe gives us:
app/Http/Controllers/CheckoutController.php:
use Illuminate\Http\Request;

class CheckoutController extends Controller
{

    public function charge(Request $request)
    {
        dd($request->all());
    }

}
Now, after filling in the form, we get this:
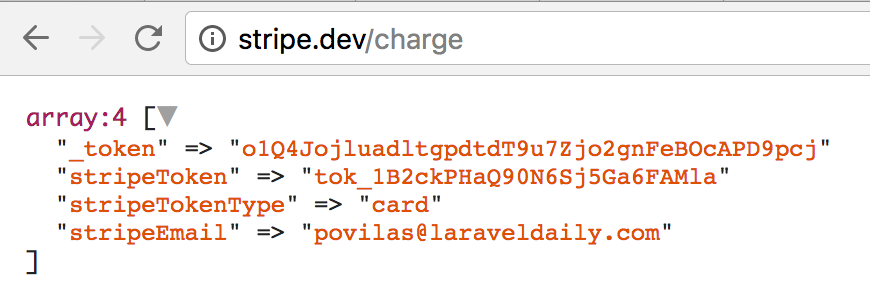
Remember I told you that Stripe returns the card token to us? So this is the one:
"stripeToken" => "tok_1B2ckPHaQ90N6Sj5Ga6FAMla"
Now we can actually use this token to charge this card. Remember – we don’t have card details and we operate only with token, returned from Stripe.
Step 4. Charging the Card
To actually charge the card, we need back-end integration – for that we use special package stripe/stripe-php
composer require stripe/stripe-php
Notice: this package is framework agnostic and can be used for any PHP framework or even with plain PHP.
Next, we return to our Controller. We copy-paste and modify some code from official Stripe documentation, and here’s how it should look:
namespace App\Http\Controllers;

use Illuminate\Http\Request;
use Stripe\Stripe;
use Stripe\Customer;
use Stripe\Charge;

class CheckoutController extends Controller
{

    public function charge(Request $request)
    {
        Stripe::setApiKey(env('STRIPE_SECRET_KEY'));

        $customer = Customer::create(array(
            'email' => $request->stripeEmail,
            'source'  => $request->stripeToken
        ));

        $charge = Charge::create(array(
            'customer' => $customer->id,
            'amount'   => 1999,
            'currency' => 'usd'
        ));
    }

}
Let’s analyze it bit by bit.
First, notice we add three Stripe classes to use:
use Stripe\Stripe;
use Stripe\Customer;
use Stripe\Charge;
Alternatively, you can use them with full path in the code, like \Stripe\Customer::create(…).
Next, we initialize Stripe package by passing our secret key as a parameter (remember I told you it would be useful).
Stripe::setApiKey(env('STRIPE_SECRET_KEY'));
Next step – we need to create a customer in Stripe system, only then we can charge them.
And we have enough data for that customer – we actually need email and stripe token which I mentioned a lot above:
$customer = Customer::create(array(
    'email' => $request->stripeEmail,
    'source'  => $request->stripeToken
));
And, finally, we actually get to charge money:
$charge = Charge::create(array(
    'customer' => $customer->id,
    'amount'   => 1999,
    'currency' => 'usd'
));
See, we charge the same amount (in cents) and same currency as in JavaScript form, and only other parameter is a customer ID, which we’ve just got from Stripe. Again, no credit card details stored in our database.
Ok, now let’s wrap up the results, whether this whole code was actually successful. For that, we use try-catch block, and show the success or error message:
try {
    Stripe::setApiKey(env('STRIPE_SECRET_KEY'));

    $customer = Customer::create(array(
        'email' => $request->stripeEmail,
        'source' => $request->stripeToken
    ));

    $charge = Charge::create(array(
        'customer' => $customer->id,
        'amount' => 1999,
        'currency' => 'usd'
    ));

    return 'Charge successful, you get the course!';
} catch (\Exception $ex) {
    return $ex->getMessage();
}
I test by using same 4242 4242 4242 4242 card, and here’s what I’ve got:
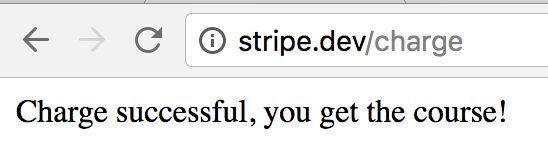
And, here’s what Stripe dashboard shows – yay, success!

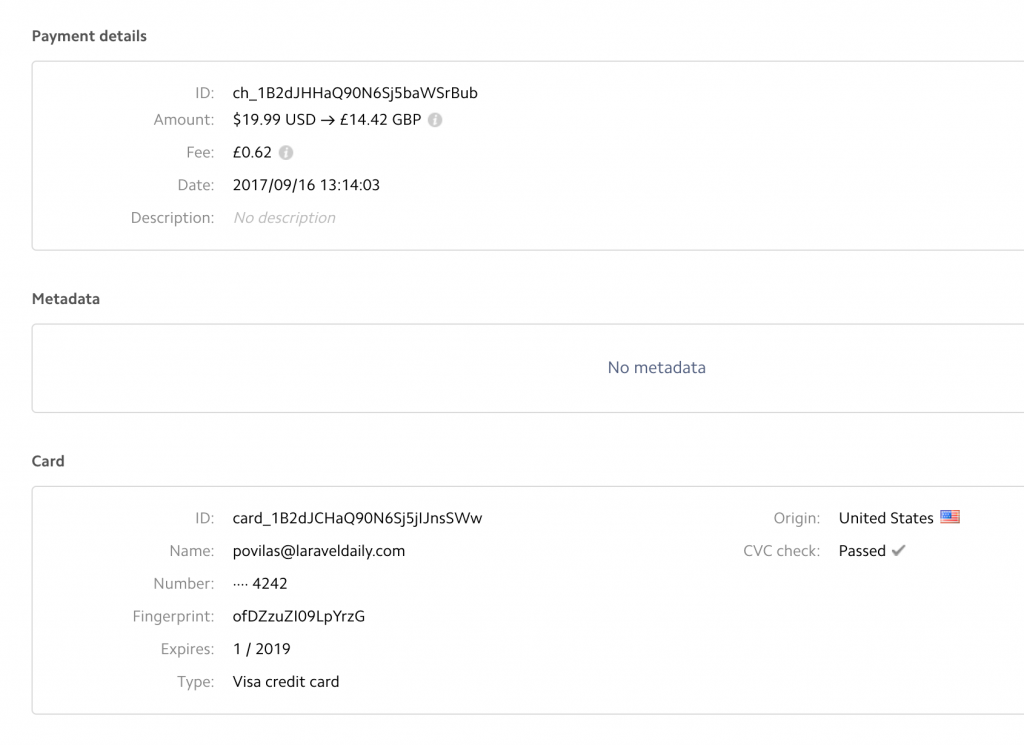
Notice: You may see currency change to GBP, cause my business (and Stripe account) is based in UK.
Ok, so basically, we’re done with quickest Stripe Checkout integration. Quite easy, isn’t it?
Recurring Charges and Subscriptions: Meet Cashier
Up until now we were talking about one-time payments for a particular product. But there are a lot of cases for subscription-based businesses, where cards should be charged monthly or yearly. Let’s see how to do that.
First, you can process it manually. So you can store credit card token and/or Stripe Customer ID in your database (but don’t store credit card details, it’s against the law in 99.99% cases), and then every month have some kind of a cron job to call Charge::create again.
But there’s a better, more convenient way – to use official package called Laravel Cashier.
First we need to create subscription plans in Stripe, like this:
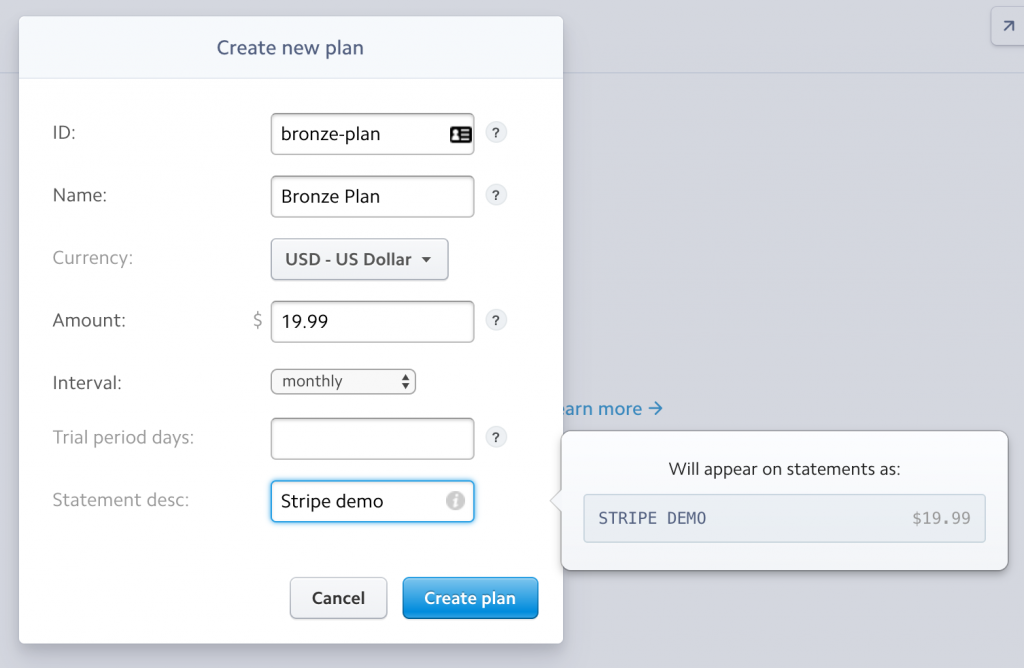
Then we can reference this plan to assign it to customers.
Now, let’s install Cashier:
composer require "laravel/cashier":"~7.0"
Then add this to config/app.php in ‘providers’ array:
Laravel\Cashier\CashierServiceProvider::class,
Next, for subscriptions data we need two database migrations. We will attach our users table data with customers on Stripe, so we add these fields:
Schema::table('users', function ($table) {
    $table->string('stripe_id')->nullable();
    $table->string('card_brand')->nullable();
    $table->string('card_last_four')->nullable();
    $table->timestamp('trial_ends_at')->nullable();
});
Also we need a new subscriptions table:
Schema::create('subscriptions', function ($table) {
    $table->increments('id');
    $table->integer('user_id');
    $table->string('name');
    $table->string('stripe_id');
    $table->string('stripe_plan');
    $table->integer('quantity');
    $table->timestamp('trial_ends_at')->nullable();
    $table->timestamp('ends_at')->nullable();
    $table->timestamps();
});
Now, run php artisan migrate.
Also, for testing purposes, I’ve created a seeder for one user.
database/seeds/DatabaseSeeder.php:
public function run()
{
    User::create([
        'name' => 'First user',
        'email' => 'user@user.com',
        'password' => bcrypt('password')
    ]);
}
And we run php artisan db:seed.
Next – we add Cashier’s Billable trait to app/User.php:
use Laravel\Cashier\Billable;

class User extends Authenticatable
{
    use Billable;
}
Finally, we need to add our config variables to config/services.php:
'stripe' => [
    'model' => App\User::class,
    'key' => env('STRIPE_PUB_KEY'),
    'secret' => env('STRIPE_SECRET_KEY'),
],
Ok, now we’re ready to actually start charging our customers. With almost the same form.
routes/web.php:
Route::get('/subscribe', function () {
    return view('subscribe');
});
Route::post('/subscribe_process', 'CheckoutController@subscribe_process');
File resources/views/subscribe.blade.php is almost identical to welcome.blade.php, just different action to the form:
<form action="/subscribe_process" method="post">
And now – the main thing: actually processing the data.
app/Http/Controllers/CheckoutController.php:
public function subscribe_process(Request $request)
{
    try {
        Stripe::setApiKey(env('STRIPE_SECRET_KEY'));

        $user = User::find(1);
        $user->newSubscription('main', 'bronze')->create($request->stripeToken);

        return 'Subscription successful, you get the course!';
    } catch (\Exception $ex) {
        return $ex->getMessage();
    }

}
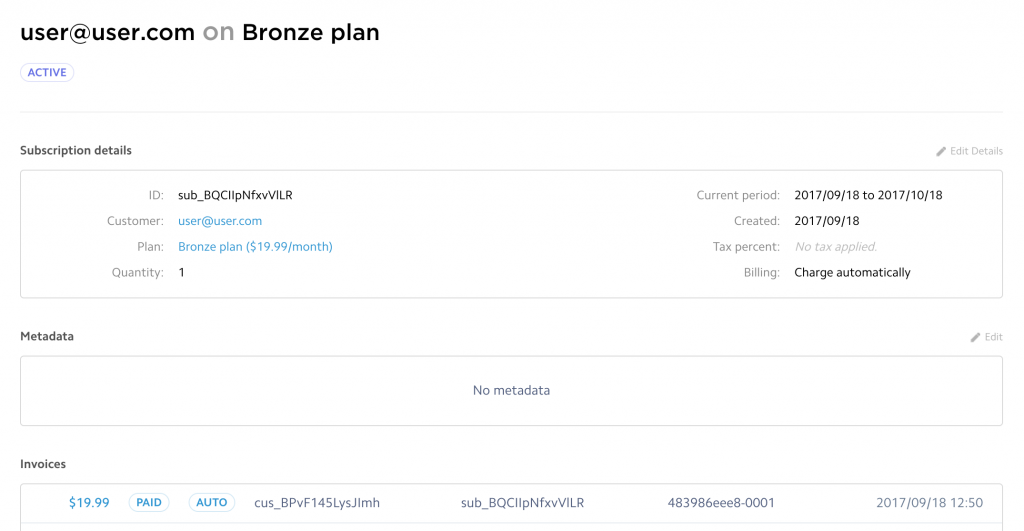
Here’s the result in Stripe dashboard.
And our database looks like this.
Users table:

Subscriptions table:

If you want to change the plan for a particular user, here’s the Controller code:
try {
    Stripe::setApiKey(env('STRIPE_SECRET_KEY'));

    $user = User::find(1);

    $user->subscription('main')->swap('silver');

    return 'Plan changed successfully!';
} catch (\Exception $ex) {
    return $ex->getMessage();
}
Similar with cancelling the subscription, it’s really simple:
$user->subscription('main')->cancel();
Invoices
Since we’re working with payments, it would be logical to touch on invoices. We’ve just covered subscriptions with Cashier, so this package also allows to view invoices data and even download PDFs really easily.
Here’s an example.
routes/web.php:
Route::get('/invoices', 'CheckoutController@invoices');
Route::get('/invoice/{invoice_id}', 'CheckoutController@invoice');
app/Http/Controllers/CheckoutController.php:
public function invoices()
{
    try {
        Stripe::setApiKey(env('STRIPE_SECRET_KEY'));

        $user = User::find(1);

        $invoices = $user->invoices();

        return view('invoices', compact('invoices'));

    } catch (\Exception $ex) {
        return $ex->getMessage();
    }

}

public function invoice($invoice_id)
{
    try {
        Stripe::setApiKey(env('STRIPE_SECRET_KEY'));

        $user = User::find(1);

        return $user->downloadInvoice($invoice_id, [
            'vendor'  => 'Your Company',
            'product' => 'Your Product',
        ]);

    } catch (\Exception $ex) {
        return $ex->getMessage();
    }

}
Also, the list of invoices.
resources/views/invoices.blade.php:
<!doctype html>
<html lang="{{ app()->getLocale() }}">
    <head>
        <meta charset="utf-8">
        <meta http-equiv="X-UA-Compatible" content="IE=edge">
        <meta name="viewport" content="width=device-width, initial-scale=1">

        <title>Laravel</title>
    </head>
    <body>
    <table>
        @foreach ($invoices as $invoice)
            <tr>
                <td>{{ $invoice->date()->toFormattedDateString() }}</td>
                <td>{{ $invoice->total() }}</td>
                <td><a href="/invoice/{{ $invoice->id }}">Download</a></td>
            </tr>
        @endforeach
    </table>
    </body>
</html>
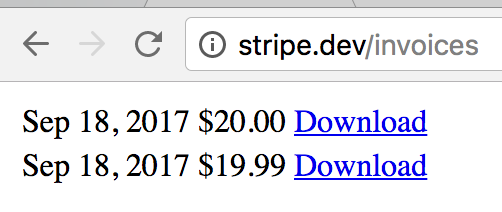
Here’s how our simplified list looks like:
And downloaded PDF invoice looks like this:
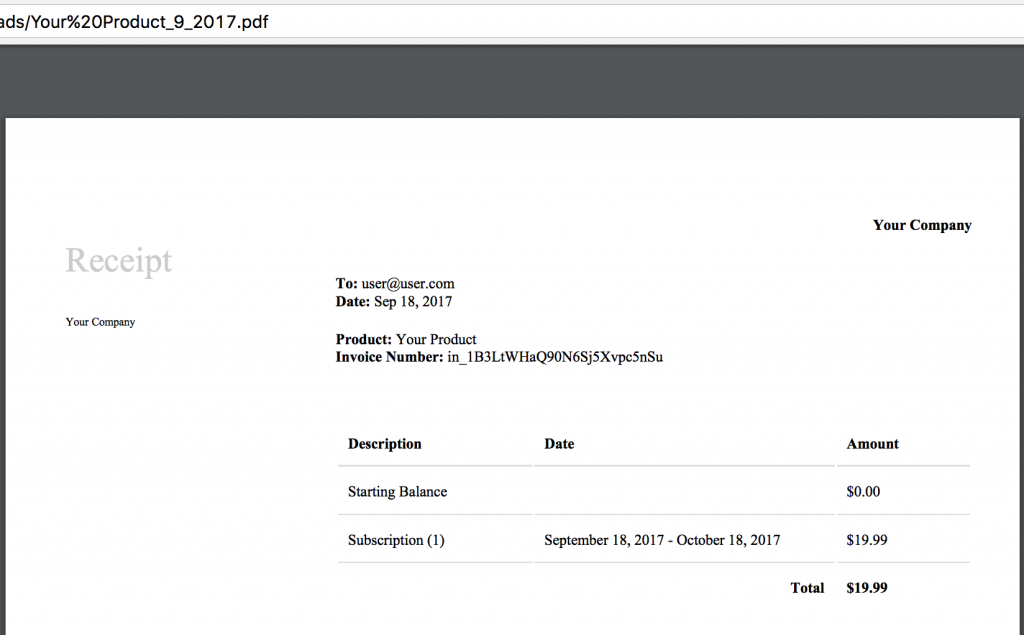
Really easy, right?
But I assume you would like to customize that invoice. It’s also pretty easy.
The view for this PDF is referred as View::make(‘cashier::receipt’), so to access and edit this file, we need to run php artisan vendor:publish for Cashier package.

Offtopic: awesome, recently-released Laravel 5.5 now asks what to publish, cool!
And then you will have file resources/views/vendor/cashier/receipt.blade.php and feel free to customize it however you want!
Final thing about invoices: you probably want to get them for one-time payments as well. I have bad news for you – direct quote from Stripe API: “Note that invoices at Stripe are part of the recurring billing process and are not intended for one-time charges.”
So if you want to have invoices for simple charges or Stripe Checkout, you would have to build that logic yourself. You can actually re-use Laravel Cashier logic and code to some extent, but it’s still manual work.
Whew, we’re done
That’s it for this big tutorial. Hopefully you will be able to adapt Stripe in your Laravel apps now, and understand some parts a little deeper.
If you want to play around with the code I’ve written here, I’ve prepared an archive for download.
And you may be interested in QuickAdminPanel – our Laravel admin panel generator, where Stripe integration is one of pre-built modules.
Anything I’ve missed? Hit me in the comments!
Additional information for reading: