Lesson 7. Roles, Permissions and Authorization
 Povilas Korop
Founder of QuickAdminPanel
Mini-course: How To Create Admin Panel in Laravel 5.4
- Lesson 1. Laravel and Default Auth
- Lesson 2. CRUDs, Migrations and Models
- Lesson 3. Menu and Routes
- Lesson 4. Index, List Table and Pagination
- Lesson 5. Create, Update Entries and Validation
- Lesson 6. Deleting Entries and Some JavaScript
- Lesson 7. Roles, Permissions and Authorization
- Lesson 8. Do It All Much Quicker with QuickAdminPanel
This chapter will be about roles, permissions and authorization of your users – it’s probably one of the most important topics in creating admin panels. Basically, we’ve created all the core CRUD features, now we can protect some of them from various types of users.
To be honest, up until Laravel 5.1.11, developers used various external packages to manage roles and permissions, and they still often do – the most popular ones are Zizaco/entrust and cartalyst/sentry.
But I’ve mentioned the exact Laravel 5.1.11 version, because that was the tipping point – where native Laravel ACL was released. From then developers could reach the same or similar goals of authorization without any external packages. So this is exactly what I’m going to show you – core Laravel functions to manage your permissions.
First, let’s set up the scene. For now we have default users table without any roles, so we need to change that. But for the sake of simplicity, we won’t create any roles-permissions table, we will just add a new field users.role as string value – ‘admin’ or ‘user’, with latter being the default.
class AddRoleToUsersTable extends Migration
{

    public function up()
    {
        Schema::table('users', function (Blueprint $table) {
            $table->string('role')->default('user');
        });
    }

    public function down()
    {
        Schema::table('users', function (Blueprint $table) {
            $table->dropColumn('role');
        });
    }
}
So, our task in reality will be to allow users to view the Authors data, but not do anything with it – so create/store/edit/update/delete should be forbidden from them. For that, we need to learn some terms.
Policies
Policy is a class that is responsible for the rules of authorization for one particular model – in our case, Author model. Let’s generate a policy for it:
php artisan make:policy AuthorPolicy --model=Author
Then we should see a new generated file app/Policies/AuthorPolicy.php:
namespace App\Policies;

use App\User;
use App\Author;
use Illuminate\Auth\Access\HandlesAuthorization;

class AuthorPolicy
{
    use HandlesAuthorization;

    /**
     * Determine whether the user can view the author.
     *
     * @param  \App\User  $user
     * @param  \App\Author  $author
     * @return mixed
     */
    public function view(User $user, Author $author)
    {
        //
    }

    /**
     * Determine whether the user can create authors.
     *
     * @param  \App\User  $user
     * @return mixed
     */
    public function create(User $user)
    {
        //
    }

    /**
     * Determine whether the user can update the author.
     *
     * @param  \App\User  $user
     * @param  \App\Author  $author
     * @return mixed
     */
    public function update(User $user, Author $author)
    {
        //
    }

    /**
     * Determine whether the user can delete the author.
     *
     * @param  \App\User  $user
     * @param  \App\Author  $author
     * @return mixed
     */
    public function delete(User $user, Author $author)
    {
        //
    }
}
You can understand all the purpose of the methods by reading the comments in docblocks. Basically, here you can write the rules for each action, let’s do exactly that.
    public function create(User $user)
    {
        return $user->role == 'admin';
    }

    public function update(User $user, Author $author)
    {
        return $user->role == 'admin';
    }

    public function delete(User $user, Author $author)
    {
        return $user->role == 'admin';
    }
Every function should return true (action allowed) or false (action forbidden) based on the $user object, which automatically represents logged-in user. In our case – for all the methods we just check if a user is an admin.
I’ve also removed view() method from the generated policy – we don’t use it in our case. Also you could remove the parameters Author $author from the methods, cause we don’t filter the authors by their objects, but in theory you can do even that.
Now, we need to register the policy and attach it to our model – it is done in a file app/Providers/AuthServiceProvider.php, which by default looks like this:
 'App\Policies\ModelPolicy',
    ];

    /**
     * Register any authentication / authorization services.
     *
     * @return void
     */
    public function boot()
    {
        $this->registerPolicies();

        //
    }
}
All we need to do is to add our policy and model into $policies array, like this:
    protected $policies = [
        'App\Model' => 'App\Policies\ModelPolicy',
        'App\Author' => 'App\Policies\AuthorPolicy',
    ];
Now we can use our policy to check if a user can access one or another action. We can check that in various stages of the app, but what I prefer to do is two things: check in Controllers and Views.
app/Http/Controllers/AuthorsController.php:
    public function create()
    {
        $this->authorize('create', Author::class);
        return view('authors.create');
    }
Yes, it’s that simple. The method $this->authorize() checks whether logged-in user has permission to the [parameter 1] method on [parameter 2] model.
Now, if we’re logged in as a user with role=’user’ (not ‘admin’), we will click the link to Add new author and see this:
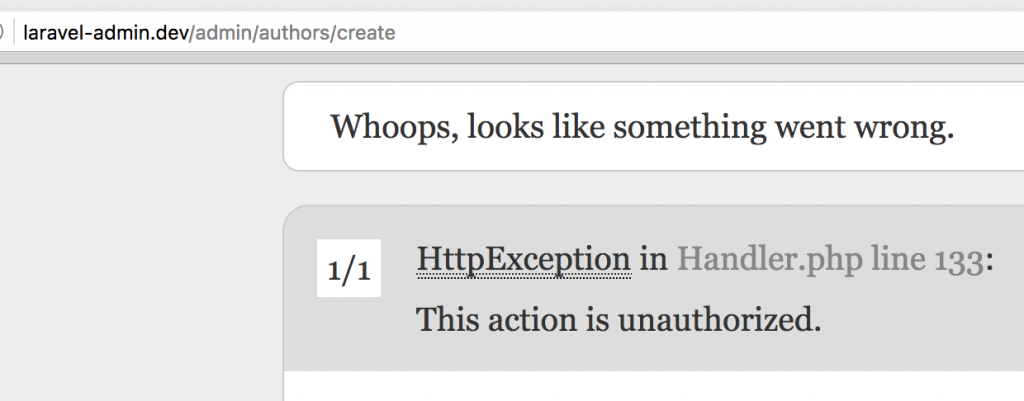
See, we don’t need to care about redirects, error handling etc – Laravel is taking care of all of that “by magic”. Of course, you can catch those exception and show more user-friendly error message, but I will leave it for you to play around.
So, we add the same checking to other methods in our Controller:
    public function create()
    {
        $this->authorize('create', Author::class);
        return view('authors.create');
    }

    public function store(StoreAuthorRequest $request)
    {
        $this->authorize('create', Author::class);
        Author::create($request->all());
        return redirect()->route('authors.index')->with(['message' => 'Author added successfully']);
    }

    public function edit($id)
    {
        $this->authorize('update', Author::class);
        $author = Author::findOrFail($id);
        return view('authors.edit', compact('author'));
    }

    public function update(StoreAuthorRequest $request, $id)
    {
        $this->authorize('update', Author::class);
        $author = Author::findOrFail($id);
        $author->update($request->all());
        return redirect()->route('authors.index')->with(['message' => 'Author updated successfully']);
    }

    public function destroy($id)
    {
        $this->authorize('delete', Author::class);
        $author = Author::findOrFail($id);
        $author->delete();
        return redirect()->route('authors.index')->with(['message' => 'Author deleted successfully']);
    }

    public function massDestroy(Request $request)
    {
        $this->authorize('delete', Author::class);
        $authors = explode(',', $request->input('ids'));
        foreach ($authors as $author_id) {
            $author = Author::findOrFail($author_id);
            $author->delete();
        }
        return redirect()->route('authors.index')->with(['message' => 'Authors deleted successfully']);
    }
As you can see, I use the same create permission to check both create() and store() methods, cause they represent the same action – creating of the entry.
But that’s not all. We also need to hide the links and the buttons from non-admin users, so they wouldn’t even see that opportunity. But please make sure that you always make security check from both front-end and back-end – only then you can feel safe.
So, in Blade templates we can use simple function/command called @can. It’s basically a block, like @if – @endif or @foreach – @endforeach, but with a different purpose – to check whether logged-in user actually can view that piece of the view. It looks like this:
resources/views/authors/index.php
    @can('create', Author::class)
        <a href="{{ route('authors.create') }}" class="btn btn-default">Add New Author</a>
        <br /><br />
    @endcan
    <table class="table table-bordered">
        <thead>
            <tr>
                @can('delete', Author::class)
                <th>
                    <input type="checkbox" class="checkbox_all">
                </th>
                @endcan
                <th>First name</th>
                <th>Last name</th>
                @can('edit', Author::class)
                <th>Actions</th>
                @endcan
            </tr>
        </thead>
        <tbody>
            @forelse($authors as $author)
            <tr>
                @can('delete', Author::class)
                <td><input type="checkbox" class="checkbox_delete"
                           name="entries_to_delete[]" value="{{ $author->id }}" /></td>
                @endcan
                <td>{{ $author->first_name }}</td>
                <td>{{ $author->last_name }}</td>
                @can('edit', Author::class)
                <td>
                    <a href="{{ route('authors.edit', $author->id) }}" class="btn btn-default">Edit</a>
                    @can('delete', Author::class)
                    <form action="{{ route('authors.destroy', $author->id) }}" method="POST"
                          style="display: inline"
                          onsubmit="return confirm('Are you sure?');">
                        <input type="hidden" name="_method" value="DELETE">
                        {{ csrf_field() }}
                        <button class="btn btn-danger">Delete</button>
                    </form>
                    @endcan
                </td>
                @endcan
            </tr>
            @empty
                <tr>
                    <td colspan="4">No entries found.</td>
                </tr>
            @endforelse
        </tbody>
    </table>
    @can('delete', Author::class)
    <form action="{{ route('authors.mass_destroy') }}" method="post"
          onsubmit="return confirm('Are you sure?');">
        {{ csrf_field() }}
        <input type="hidden" name="_method" value="DELETE">
        <input type="hidden" name="ids" id="ids" value="" />
        <input type="submit" value="Delete selected" class="btn btn-danger" />
    </form>
    @endcan
Quite a long piece of code, but you should understand it easily. @can – @endcan blocks accept identically the same parameters as $this->authorize method in controllers.
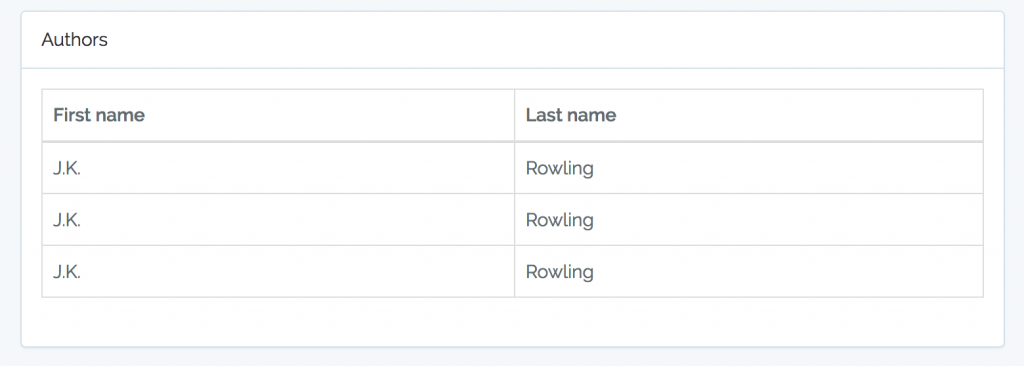
If we are logged in as a simple user, we shouldn’t see any buttons anymore, only the list, like this:
So this is a basic way to protect some of your methods, or even whole controllers, from unauthorized access. As I said, we’ve simplified it a lot, but you can extend the functionality to add roles table, put the permissions to the database as well, make it dynamically manageable etc. I will leave it to your fantasy.
Also, I won’t show the example CRUD for Books – let it be your homework. Should be pretty simple after all these examples, right?
And I guess that’s it for the basic admin panel creation. Now you know all the core you need:
- How authentication and login system works
- How to build menu list and URL routing
- How to view the list of entries
- How to create/edit/delete entries
- How to protect your entries from unauthorized access
If you want to play around with this simple project, download the code archive here.
From here I could wish you a good luck in implementing it all in real-life project. But before we go, there’s something else I need to show you.
Remember all the lessons when we have written all the code for our project? What if I told you there’s a way to do it all in 5 minutes and without writing any code? Check out the next final chapter.
- Lesson 1. Laravel and Default Auth
- Lesson 2. CRUDs, Migrations and Models
- Lesson 3. Menu and Routes
- Lesson 4. Index, List Table and Pagination
- Lesson 5. Create, Update Entries and Validation
- Lesson 6. Deleting Entries and Some JavaScript
- Lesson 7. Roles, Permissions and Authorization
- Lesson 8. Do It All Much Quicker with QuickAdminPanel